Selasa, 30 September 2025

Published September 30, 2025 by with 0 comment

170+ Sawmill Storage Shed Gray Zone

When coal was king: sawmill owned by pacific coast coal company voiceofthevalley.com

```html
Introduction: The DIY Sawmill Storage Shed A Guide to Secure and Organized Sawmilling Are you tired of leaving your precious sawmill exposed to the elements? A DIY storage shed is the perfect solution! This post will guide you through the process of building a simple yet effective shed to protect your sawmill and keep your workspace organized.
Planning and Preparation Before you grab your tools, careful planning is essential. Here's what you need to consider:
  • Determine the Size: Measure your sawmill's dimensions (length, width, height) and add extra space for maneuvering and storing accessories.
  • Choose a Location: Select a level area near your milling operations, considering drainage and accessibility.
  • Design Your Shed: Decide on the style (simple lean-to, gable roof, etc.) and create a basic sketch with dimensions. This helps visualize the final product.
  • Gather Materials: Create a list of materials based on your design. This includes lumber (for framing, sheathing, and roofing), fasteners (nails, screws), roofing material, and optionally, a door and windows. Consider treated lumber for ground contact.
  • Tools Needed: Saw (circular saw, miter saw), drill/driver, level, measuring tape, hammer, safety glasses, gloves.
Step 1: Building the Foundation/Base The foundation provides a stable and level base for your shed. There are a few options:
  • Gravel Pad (Simple): Clear the chosen area, level it, and create a gravel pad. This is a cost-effective option for smaller sheds.
  • Concrete Blocks: Set concrete blocks on the leveled ground and build a wooden frame on top. Ensure the frame is square and level.
  • Concrete Slab (Permanent): Pour a concrete slab for a more permanent and durable foundation. This requires more effort and expense.
For this guide, we'll assume you're using concrete blocks and a wooden frame. Build the frame with pressure-treated lumber to prevent rot. Securely attach the frame to the concrete blocks.
Step 2: Framing the Walls Building the wall frames is crucial for structural integrity.
  • Cut the Studs: Determine the wall height and cut studs to that length. Remember to deduct the thickness of the top and bottom plates.
  • Assemble the Frames: Lay out the top and bottom plates on a flat surface. Space the studs 16 inches on center (OC) and nail or screw them securely to the plates.
  • Frame Openings: Include framing for the door and any windows you plan to include. Add headers above the openings for support.
  • Raise and Secure the Walls: Carefully raise each wall frame and secure it to the base frame. Use a level to ensure the walls are plumb. Use temporary braces to hold them in place.
Step 3: Building the Roof The roof protects your sawmill from the elements. A simple lean-to roof is a good option for beginners.
  • Determine the Slope: Decide on the desired roof slope. A steeper slope allows for better water runoff.
  • Build the Rafters: Cut rafters to the appropriate length, considering the roof slope and overhang.
  • Install the Rafters: Attach the rafters to the top plates of the walls. Space them evenly, typically 24 inches OC.
  • Sheath the Roof: Cover the rafters with plywood or OSB sheathing. Nail or screw the sheathing securely to the rafters.
Step 4: Roofing Applying roofing material protects the sheathing from water damage.
  • Underlayment (Optional): Install roofing underlayment (felt paper) over the sheathing for added protection.
  • Choose Roofing Material: Select a roofing material that suits your budget and aesthetic preferences (asphalt shingles, metal roofing, etc.).
  • Install Roofing Material: Follow the manufacturer's instructions for installing your chosen roofing material. Overlap the courses properly to ensure a watertight seal.
Step 5: Adding the Door (Optional) A door provides secure access to your sawmill.
  • Build a Door Frame: Build a wooden frame that fits snugly into the door opening.
  • Build or Purchase a Door: You can build a simple wooden door or purchase a pre-made door.
  • Install the Door: Hinge the door to the door frame and install a latch or lock for security.
Step 6: Sheathing the Walls (Optional) Sheathing the walls adds extra protection and structural integrity.
  • Cut Sheathing Material: Cut plywood or OSB sheathing to fit the wall frames.
  • Attach Sheathing: Nail or screw the sheathing to the wall frames, ensuring it is flush with the studs.
Step 7: Finishing Touches These final steps add functionality and aesthetics to your shed.
  • Add Trim: Install trim around the door, windows, and corners to cover exposed edges and improve the appearance.
  • Paint or Stain: Paint or stain the shed to protect the wood and give it a finished look.
  • Organize Your Sawmill: Place your sawmill inside the shed and organize your accessories and tools.
Conclusion: A Secure and Organized Milling Space Congratulations! You've successfully built a DIY sawmill storage shed. This shed will protect your valuable equipment from the elements, keep your workspace organized, and prolong the life of your sawmill. With proper planning and careful execution, you can enjoy a secure and efficient milling experience for years to come.
```

Big Ol Machine Photograph By Jill Rhynard

Big ol machine photograph by jill rhynard fineartamerica.com

Lake Washington Coal Cars

Lake washington coal cars dcsfilms.com

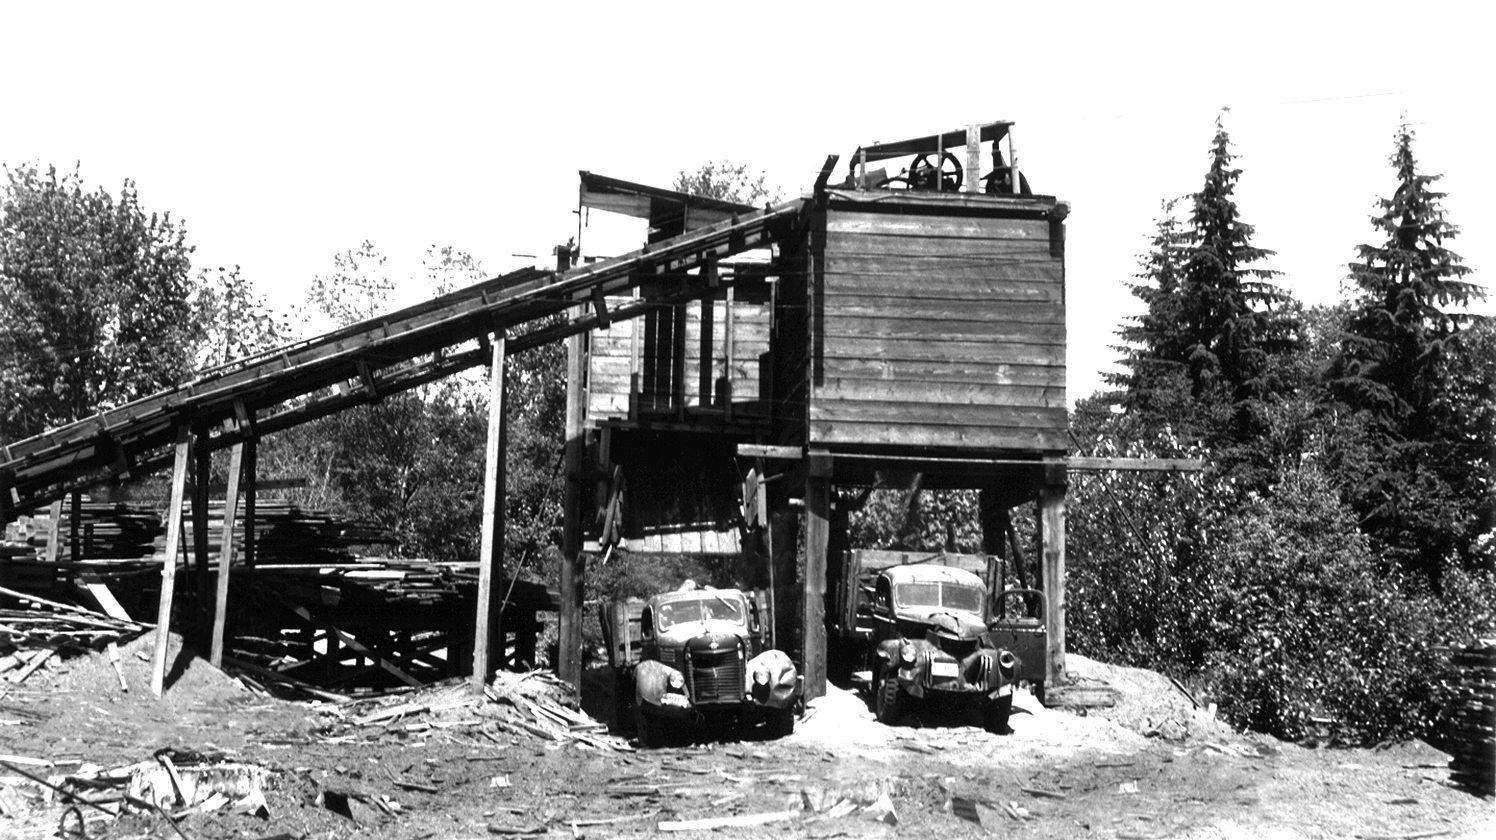
When Coal Was King: Sawmill Owned By Pacific Coast Coal Company

When coal was king: sawmill owned by pacific coast coal company voiceofthevalley.com
Read More
      edit

Senin, 29 September 2025

Published September 29, 2025 by with 0 comment

90+ Flat Roof Extension Design Ideas

Flats free stock photo www.freeimages.com

```html
Introduction: Expanding Your Home with a Flat Roof Extension
Adding an extension to your home can significantly enhance living space and improve its functionality. A flat roof extension is a modern and cost-effective solution, often favored for its simplicity and potential for incorporating features like skylights or roof gardens. This guide provides a step-by-step approach to building your own flat roof extension, but please note this is a complex project that may require professional assistance. Ensure you comply with all local building codes and regulations before commencing any work.
Step 1: Planning and Design
  • Initial Consultation: Meet with an architect or structural engineer. They can assess the feasibility of your project, create detailed plans, and ensure compliance with building regulations.
  • Design Considerations: Determine the size and layout of your extension. Consider factors like room usage, window placement, door access, and the overall aesthetics of your home.
  • Building Regulations: Obtain necessary permits and approvals from your local building authority. This is crucial to avoid legal issues and ensure the structural integrity of your extension. Pay particular attention to regulations regarding insulation, fire safety, and drainage.
  • Material Selection: Choose suitable materials for your foundation, walls, roof, and finishes. Consider factors like cost, durability, insulation value, and aesthetic appeal. Common roofing materials include EPDM rubber, felt, and fiberglass.
  • Step 2: Foundation Preparation
  • Excavation: Excavate the ground according to your plans, ensuring the foundation is level and stable. The depth will depend on soil conditions and local building codes.
  • Concrete Pouring: Pour the concrete foundation, reinforcing it with steel rebar for added strength. Ensure the foundation is properly cured before proceeding to the next step.
  • Damp-Proof Course (DPC): Install a DPC to prevent moisture from rising up through the foundation into the walls. This is essential for preventing dampness and structural damage.
  • Step 3: Wall Construction
  • Framing: Build the wall framework using timber or steel studs. Ensure the frame is plumb and square. Leave openings for windows and doors according to your plans.
  • Sheathing: Cover the exterior of the frame with sheathing boards (e.g., plywood or OSB) to provide structural support and a surface for attaching exterior cladding.
  • Insulation: Install insulation within the wall cavities to improve energy efficiency. Common insulation types include fiberglass, mineral wool, and rigid foam boards.
  • Vapor Barrier: Install a vapor barrier on the warm side of the insulation to prevent moisture from condensing within the walls.
  • Exterior Cladding: Apply your chosen exterior cladding, such as siding, brick veneer, or stucco, to protect the walls from the elements and enhance the appearance of your extension.
  • Step 4: Flat Roof Construction
  • Roof Joists: Install roof joists that span the width of the extension. Ensure they are strong enough to support the roof load, including snow and wind. The joists should be slightly sloped (typically 1-2 degrees) to allow for water runoff.
  • Roof Decking: Cover the joists with roof decking (e.g., plywood or OSB). Secure the decking to the joists with screws or nails.
  • Insulation: Install a layer of insulation on top of the roof decking to reduce heat loss and improve energy efficiency. Use insulation specifically designed for flat roofs.
  • Roof Membrane: Apply the chosen roofing membrane (e.g., EPDM rubber, felt, or fiberglass). Follow the manufacturer's instructions carefully to ensure a watertight seal. Ensure the membrane extends up the walls slightly to create a flashing effect.
  • Edge Trims and Flashing: Install edge trims and flashing around the perimeter of the roof and around any penetrations (e.g., skylights, vents) to prevent water ingress.
  • Drainage: Install a drainage system to remove water from the roof. This typically involves gutters and downspouts. Ensure the drainage system is properly sized to handle the expected rainfall.
  • Step 5: Interior Finishing
  • Electrical and Plumbing: Run electrical wiring and plumbing pipes to the extension, connecting them to your existing systems. Hire licensed professionals for these tasks to ensure safety and compliance with building codes.
  • Insulation: Insulate the interior walls and ceiling to improve comfort and energy efficiency.
  • Drywall: Install drywall on the interior walls and ceiling. Tape and mud the joints to create a smooth surface.
  • Painting: Paint the walls and ceiling with your chosen colors.
  • Flooring: Install flooring, such as hardwood, tile, or carpet.
  • Fixtures and Fittings: Install light fixtures, outlets, switches, doors, windows, and other fixtures and fittings.
  • Step 6: Final Inspection and Completion
  • Final Inspection: Schedule a final inspection with your local building authority to ensure the extension complies with all building codes and regulations.
  • Snagging: Address any snags or issues identified during the final inspection.
  • Finishing Touches: Add any final touches, such as landscaping, furniture, and décor.
  • Conclusion: Enjoy Your New Living Space
    Building a flat roof extension is a challenging but rewarding project that can significantly improve your home. By following these steps and adhering to building regulations, you can create a functional and aesthetically pleasing addition to your living space. Remember to prioritize safety and seek professional help when needed. Enjoy your new extension!
    ```

    What Is A Flat? Discover If This Rental Option Is Right For You

    What is a flat? discover if this rental option is right for you www.apartmentguide.com

    Flats Free Stock Photo

    Flats free stock photo www.freeimages.com

    100+ Flats Pictures

    100+ flats pictures unsplash.com
    Read More
          edit

    Minggu, 28 September 2025

    Published September 28, 2025 by with 0 comment

    171+ Chicken Coop Outdoor Area

    Raising chickens 101: a beginner's guide to chickens www.almanac.com

    ```html
    Opening: Building a DIY Chicken Coop Outdoor Area Providing your chickens with a safe and stimulating outdoor area is crucial for their well-being and egg production. This guide will walk you through building a simple and functional chicken coop outdoor area, often called a run, step-by-step. We'll cover the essentials from planning to construction, ensuring your flock has a happy and healthy space.
    Step 1: Planning and Design Before you start building, careful planning is essential. Consider these factors:
    • Size: Determine the appropriate size based on the number of chickens you have. A general rule is 4-5 square feet per chicken inside the coop and 8-10 square feet per chicken in the outdoor run.
    • Location: Choose a level area with good drainage and partial shade. Consider proximity to your house for easy access.
    • Materials: Decide on the materials you'll use. Common choices include pressure-treated lumber for framing, chicken wire or hardware cloth for the enclosure, and gravel or wood chips for the ground.
    • Security: Protect your chickens from predators such as foxes, raccoons, and hawks. Use sturdy materials and consider burying the wire mesh a few inches into the ground to prevent digging.
    Step 2: Gathering Materials and Tools Make a detailed list of the materials you need based on your design. Typical materials include:
    • Pressure-treated lumber (e.g., 2x4s for framing, 4x4s for posts)
    • Chicken wire or hardware cloth (1/2 inch mesh recommended for predator protection)
    • Fasteners (screws, nails, staples)
    • Gravel or wood chips for ground cover
    • Gate hinges and latch
    • Optional: Roofing material (e.g., corrugated metal or polycarbonate sheets)
    Gather the necessary tools:
    • Measuring tape
    • Saw (circular saw or hand saw)
    • Drill and driver
    • Staple gun
    • Hammer
    • Level
    • Wire cutters
    • Shovel
    Step 3: Building the Frame Construct the frame of the outdoor run using the pressure-treated lumber.
    • Corner Posts: Set the 4x4 posts at each corner of the planned area. Dig holes, insert the posts, and ensure they are level and plumb. You can use concrete to secure the posts, but it's not always necessary, especially if the soil is compact.
    • Framing: Connect the corner posts with 2x4 lumber to create the top and bottom rails of the frame. Use screws or nails to secure the lumber to the posts. Add intermediate posts if the run is large to provide extra support.
    Step 4: Attaching the Wire Mesh Enclose the frame with chicken wire or hardware cloth.
    • Cutting: Measure and cut the wire mesh to fit the frame. Overlap the edges slightly for added strength.
    • Attaching: Use a staple gun to securely attach the wire mesh to the frame. Ensure the staples are closely spaced to prevent predators from prying the wire loose.
    • Burying: To prevent digging, bury the bottom edge of the wire mesh a few inches into the ground. You can also create a "skirt" by extending the wire mesh horizontally outward from the base of the run.
    Step 5: Building and Installing the Gate Create a gate for easy access to the outdoor run.
    • Frame: Build a simple frame for the gate using 2x4 lumber. Ensure the gate is slightly smaller than the opening to allow for easy swinging.
    • Wire Mesh: Cover the gate frame with chicken wire or hardware cloth.
    • Hinges and Latch: Attach hinges to the gate and the frame of the run. Install a latch to securely close the gate.
    Step 6: Adding Ground Cover and Enhancements Improve the comfort and functionality of the outdoor run.
    • Ground Cover: Spread gravel or wood chips on the ground to provide drainage and prevent mud. You can also use sand, but be aware that it can become dusty.
    • Dust Bathing Area: Chickens need dust baths to control parasites. Create a designated dust bathing area by filling a shallow container with sand and diatomaceous earth.
    • Perches: Add perches for the chickens to roost and observe their surroundings. Use branches or sturdy lumber.
    • Shade: If the run is not naturally shaded, provide artificial shade using tarps or shade cloth. You can also plant shrubs or vines along the outside of the run for natural shade.
    • Optional Roofing: Add roofing material to cover part or all of the run, especially in areas with heavy rain or snow. This will provide shelter from the elements and keep the ground drier.
    Conclusion: A Happy and Healthy Flock By following these steps, you can create a safe, functional, and enriching outdoor area for your chickens. Regular maintenance, such as cleaning the run and checking for signs of wear and tear, will ensure your flock remains healthy and happy for years to come. Enjoy the benefits of fresh eggs and the satisfaction of knowing you've provided your chickens with a great environment!
    ```

    Grilled Chicken Leg Quarters

    Grilled chicken leg quarters thecookful.com

    Raising Chickens 101: A Beginner's Guide To Chickens

    Raising chickens 101: a beginner's guide to chickens www.almanac.com

    Cantonese Roast Chicken

    Cantonese roast chicken tarasmulticulturaltable.com
    Read More
          edit

    Sabtu, 27 September 2025

    Published September 27, 2025 by with 0 comment

    97+ Shed Roof House With Porch

    Cedar shed kits, cedar garden & storage sheds cedarshed.com

    Opening: Dreamy DIY Shed Roof House with Porch. Ready to build your own cozy haven? This guide walks you through creating a 97+ shed roof house with a welcoming porch. Prepare for some construction, but the result will be a rewarding and unique space. Let's get started!
    Step 1: Planning and Design. Before you pick up a hammer, meticulous planning is key.
  • Determine the dimensions of your shed roof house. Consider local building codes and permit requirements.
  • Create detailed blueprints or sketches, including the overall structure, porch layout, window and door placement, and roofing details.
  • Decide on the materials you'll use: lumber for framing, sheathing for walls and roof, roofing material (shingles, metal, etc.), siding, porch decking, and foundation material (concrete slab, pier and beam, etc.).
  • Estimate material costs and create a budget.
  • Step 2: Foundation. A solid foundation is crucial for a stable structure.
  • Prepare the site by clearing vegetation and leveling the ground.
  • Construct your chosen foundation. Options include: a concrete slab, pier and beam, or gravel pad (depending on size and local regulations). Ensure it's level and properly compacted.
  • For a concrete slab, pour and cure the concrete according to instructions.
  • For pier and beam, set the piers in concrete and install the beams to create a level platform.
  • Step 3: Framing the Walls. Build the walls, ensuring they are strong and square.
  • Cut lumber according to your plans for wall studs, top plates, and bottom plates.
  • Assemble the wall frames on the ground, nailing or screwing the studs to the top and bottom plates at regular intervals (usually 16 or 24 inches on center).
  • Raise the wall frames and secure them to the foundation, plumb and level.
  • Brace the walls temporarily to prevent them from falling.
  • Connect the wall frames at the corners and along the top plates.
  • Step 4: Framing the Roof. Construct the shed roof, considering proper slope and support.
  • Calculate the necessary roof pitch and rafter lengths.
  • Cut the rafters according to your calculations.
  • Install the rafters, ensuring they are properly spaced and secured to the top plates of the walls. Use hurricane ties or rafter ties for extra strength.
  • Add a ridge board or beam for added support, if necessary.
  • Sheathe the roof with plywood or OSB, nailing or screwing it securely to the rafters.
  • Step 5: Installing Windows and Doors. Frame openings and install windows and doors.
  • Frame the openings for windows and doors, adding headers to support the load above.
  • Install windows and doors according to the manufacturer's instructions, ensuring they are plumb, level, and properly sealed.
  • Add trim around the windows and doors for a finished look.
  • Step 6: Adding Siding and Roofing. Protect the structure from the elements.
  • Install siding on the exterior walls, following the manufacturer's instructions. Options include wood siding, vinyl siding, metal siding, etc.
  • Install roofing material, starting from the bottom and working your way up. Overlap the roofing material properly to prevent leaks. Add flashing around chimneys, vents, and other roof penetrations.
  • Step 7: Building the Porch. Create a welcoming outdoor space.
  • Frame the porch floor, similar to the main structure's floor, using posts, beams, and joists.
  • Attach the porch floor to the main structure or build it as a separate, freestanding structure.
  • Install decking on the porch floor.
  • Build porch railings and steps for safety and aesthetics.
  • Add a roof to the porch, if desired, extending the shed roof or building a separate roof structure.
  • Step 8: Interior Finishing. Transform the inside into a comfortable living space.
  • Install insulation in the walls and roof to improve energy efficiency.
  • Run electrical wiring and plumbing, if desired. Consult with a qualified electrician and plumber to ensure compliance with local codes.
  • Install interior wall coverings, such as drywall or paneling.
  • Install flooring, such as wood, laminate, or tile.
  • Add trim and moldings for a finished look.
  • Step 9: Painting and Landscaping. Add the finishing touches.
  • Paint or stain the exterior and interior of the shed roof house.
  • Landscape the surrounding area, adding plants, trees, and other features to enhance the aesthetic appeal.
  • Add furniture and accessories to create a comfortable and inviting space.
  • Conclusion: Enjoy Your Creation!. Congratulations on building your own 97+ shed roof house with a porch! It's a labor of love, but you now have a unique and cozy space to enjoy for years to come. Remember to maintain the structure regularly to ensure its longevity. Happy relaxing!

    Cedar Lap Siding Deluxe Estate Sheds

    Cedar lap siding deluxe estate sheds www.gazebocreations.com

    Cedar Lap Siding Saltbox Sheds

    Cedar lap siding saltbox sheds www.gazebocreations.com

    Cedar Shed Kits, Cedar Garden & Storage Sheds

    Cedar shed kits, cedar garden & storage sheds cedarshed.com
    Read More
          edit

    Jumat, 26 September 2025

    Published September 26, 2025 by with 0 comment

    163+ Flat Roof House With Balcony

    Best 20+ flat pictures & images unsplash.com

    ```html
    Introduction: Building a Flat Roof House with Balcony A DIY Guide This post provides a step-by-step guide on how to build a small-scale model or diorama of a flat roof house with a balcony. This project is ideal for hobbyists, model builders, or anyone interested in architectural design. We'll cover the basic construction techniques and materials you'll need to bring your vision to life.
    Materials & Tools:
  • Cardboard or Foam Board (for walls, roof, and base)
  • Balsa Wood or Popsicle Sticks (for balcony railing and detailing)
  • Craft Knife or Scissors
  • Ruler or Measuring Tape
  • Pencil
  • Glue (Hot Glue or Craft Glue)
  • Paint (Acrylic or Spray Paint)
  • Optional: Sandpaper, Decorative Items (miniature plants, furniture)
  • Step 1: Planning and Design Before you start cutting, sketch out a rough plan of your house. Decide on the dimensions (length, width, height) of the house and the size and position of the balcony. Consider the scale you want to work with. A simple sketch will help you visualize the final product and avoid mistakes later.
    Step 2: Cutting the Walls Using your plan as a guide, measure and cut out the four walls of the house from your chosen material (cardboard or foam board). Ensure the edges are straight and clean. For a more realistic look, you can add window and door openings using your craft knife.
    Step 3: Assembling the Walls Apply glue to the edges of the wall pieces and join them together to form the main structure of the house. Use clamps or tape to hold the walls in place until the glue dries completely. Ensure the corners are square for a sturdy build.
    Step 4: Creating the Roof Measure the top of the house structure and cut a piece of cardboard or foam board to fit. This will be the flat roof. Apply glue to the top edges of the walls and attach the roof panel. Again, secure with clamps or tape until the glue has dried.
    Step 5: Building the Balcony Cut out a rectangular piece of cardboard or foam board to serve as the balcony floor. This piece should extend out from one of the walls of the house. Glue this piece to the chosen wall, making sure it's securely attached. Use additional pieces of cardboard or foam board as supports underneath the balcony floor for added stability.
    Step 6: Adding the Balcony Railing Using balsa wood or popsicle sticks, create the railing for the balcony. Cut the wood into the desired lengths and shapes for the posts and rails. Glue the pieces together to form the railing and then attach it to the edge of the balcony floor.
    Step 7: Painting and Detailing Once the glue has completely dried, paint the house and balcony in your desired colors. You can use acrylic paints or spray paint. Add details such as window frames, door frames, and any other architectural elements you desire. You can also add decorative elements like miniature plants or furniture to the balcony to enhance the realism.
    Step 8: Base and Finishing Touches Cut a larger piece of cardboard or foam board to serve as the base for your house. Glue the house to the base. This will provide a stable platform for your model. You can add landscaping details to the base, such as grass or pathways, to create a more realistic scene.
    Conclusion: Enjoy Your Creation! Congratulations! You have successfully built a DIY flat roof house with a balcony. This project allows for creativity and personalization. Feel free to experiment with different materials, designs, and details to create a unique and eye-catching model. You can adapt this technique to build different architectural styles and expand your model-building skills.
    ```

    What Is A Flat? Discover If This Rental Option Is Right For You

    What is a flat? discover if this rental option is right for you www.apartmentguide.com

    Flats Free Stock Photo

    Flats free stock photo www.freeimages.com

    Best 20+ Flat Pictures & Images

    Best 20+ flat pictures & images unsplash.com
    Read More
          edit

    Kamis, 25 September 2025

    Published September 25, 2025 by with 0 comment

    167+ Shed Plan Diy

    Cedar shed kits, cedar garden & storage sheds cedarshed.com

    Introduction: Building Your Own 16x7 Shed Are you dreaming of extra storage space, a workshop, or a hobby haven? Building a 16x7 shed is a fantastic DIY project that can add value and functionality to your property. This guide will walk you through the process step-by-step, from planning to completion. Let's get started!
    Step 1: Planning and Preparation Before you pick up a hammer, careful planning is crucial. This stage sets the foundation for a successful shed build.
  • Decide on Location: Consider accessibility, drainage, and sunlight. Ensure you comply with local building codes and regulations regarding shed placement.
  • Obtain Permits: Check with your local municipality about necessary permits before starting construction.
  • Create a Detailed Plan: A well-defined plan includes dimensions, materials list, and construction sequence. Several resources online offer 16x7 shed plans for purchase or inspiration.
  • Gather Tools and Materials: Having the right tools and materials readily available will streamline the building process. Essential tools include a measuring tape, level, saw (circular or miter), drill, hammer, safety glasses, and work gloves. Materials will include lumber (pressure-treated for the base), plywood, roofing materials, siding, nails, screws, and concrete blocks or gravel for the foundation.
  • Step 2: Building the Foundation A solid foundation is essential for a long-lasting shed.
  • Prepare the Site: Clear the area of grass, debris, and topsoil. Level the ground using a shovel and rake.
  • Create a Base: Options include concrete blocks, gravel pad, or a poured concrete slab. For concrete blocks, arrange them evenly spaced to support the floor frame. A gravel pad requires compacting a layer of gravel for drainage and stability.
  • Build the Floor Frame: Construct a rectangular frame using pressure-treated lumber. Ensure the frame is square and level before attaching it to the foundation.
  • Attach Floor Joists: Install floor joists within the frame, spaced according to your plan. These provide support for the flooring.
  • Lay the Flooring: Attach plywood sheets to the floor joists, securing them with screws.
  • Step 3: Framing the Walls Now it's time to build the walls.
  • Cut the Wall Studs: Cut the wall studs to the desired height according to your plan.
  • Assemble Wall Frames: Construct the wall frames by attaching the studs to top and bottom plates. Ensure the frames are square.
  • Frame Openings: Frame openings for the door and windows. Add headers above these openings for support.
  • Raise the Walls: Carefully raise the wall frames one by one, securing them to the floor frame with nails or screws. Use a level to ensure the walls are plumb.
  • Brace the Walls: Temporarily brace the walls to keep them in place while you work on the remaining walls.
  • Connect the Walls: Secure the walls together at the corners using nails or screws. Add corner bracing for extra stability.
  • Step 4: Installing the Roof The roof protects your shed from the elements.
  • Build Rafters or Trusses: Construct rafters or trusses according to your plan. Rafters are individual supports, while trusses are pre-fabricated or custom-built frameworks.
  • Attach Rafters or Trusses: Attach the rafters or trusses to the top plates of the walls, ensuring they are evenly spaced and securely fastened.
  • Install Sheathing: Cover the rafters or trusses with plywood sheathing, securing it with nails or screws.
  • Apply Roofing Material: Install your chosen roofing material, such as asphalt shingles, metal roofing, or wood shakes. Follow the manufacturer's instructions carefully.
  • Step 5: Adding Siding and Finishing Touches Give your shed its final look and functionality.
  • Install Siding: Attach siding to the exterior walls. Common siding options include wood siding, vinyl siding, or metal siding.
  • Install Door and Windows: Install the door and windows into the framed openings. Ensure they are properly sealed to prevent drafts and water leaks.
  • Add Trim: Add trim around the door, windows, and corners to enhance the shed's appearance.
  • Paint or Stain: Paint or stain the siding and trim to protect the wood and give the shed a finished look.
  • Add Interior Finishing (Optional): Consider adding insulation, interior walls, shelving, or electrical wiring to customize your shed for its intended use.
  • Conclusion: Enjoy Your New 16x7 Shed Congratulations! You've successfully built your own 16x7 shed. Take pride in your accomplishment and enjoy the added storage space or workspace. Remember to periodically inspect and maintain your shed to ensure its longevity. With proper care, your shed will provide years of service.

    Quality Outdoor Structures T0808sv Wood Storage Shed (8 Ft. X 8 Ft.)

    Quality outdoor structures t0808sv wood storage shed (8 ft. x 8 ft.) www.sears.com

    Forest Garden 4 X 3 Wooden Storage Shed

    Forest garden 4 x 3 wooden storage shed www.wayfair.co.uk

    Cedar Shed Kits, Cedar Garden & Storage Sheds

    Cedar shed kits, cedar garden & storage sheds cedarshed.com
    Read More
          edit

    Rabu, 24 September 2025

    Published September 24, 2025 by with 0 comment

    83+ Tuff Shed Interior Ideas

    Beige textured rock fragment free stock photo www.freeimages.com

    ```html
    Introduction: Transforming Your Tuff Shed into a Functional Space
    Tuff Sheds are incredibly versatile, providing a blank canvas for various uses. Whether you envision a workshop, home office, art studio, or she-shed, transforming the interior requires planning and effort. This guide will provide a step-by-step process for customizing your Tuff Shed into your dream space. Remember to always prioritize safety and obtain any necessary permits before starting your project.
    Step 1: Planning and Design
  • Determine Your Shed's Purpose: Clearly define how you intend to use the shed. This will dictate the layout, electrical needs, insulation requirements, and finishing touches.
  • Sketch a Floor Plan: Create a detailed floor plan showing the placement of furniture, workstations, storage, and any other essential elements. Consider the flow of movement and accessibility.
  • Develop a Budget: Establish a realistic budget that accounts for all materials, tools, and potential professional services (e.g., electrical work). Research material costs thoroughly.
  • Obtain Necessary Permits: Check with your local building department to determine if any permits are required for interior modifications, especially for electrical or plumbing work. Ignoring permit requirements can lead to fines and delays.
  • Step 2: Insulation and Vapor Barrier
  • Choose Insulation: Select an appropriate insulation type based on your climate and budget. Options include fiberglass batts, rigid foam board, spray foam, and mineral wool. Consider the R-value (thermal resistance) of each option.
  • Install Insulation: Carefully install the insulation between the wall studs and ceiling joists. Ensure a tight fit to minimize air gaps and maximize insulation effectiveness. Wear protective gear (gloves, mask, and eye protection) when handling insulation materials.
  • Apply Vapor Barrier: Install a vapor barrier (e.g., polyethylene sheeting) over the insulation on the warm side of the wall (usually the interior side). This prevents moisture from condensing within the wall cavity, which can lead to mold and rot. Overlap seams by at least 6 inches and seal them with tape.
  • Step 3: Electrical Wiring (If Required)
  • Plan Electrical Layout: Determine the placement of outlets, switches, and lighting fixtures based on your floor plan and power needs.
  • Hire a Qualified Electrician: Unless you are a licensed electrician, it is highly recommended to hire a professional for all electrical work. Incorrect wiring can be dangerous and pose a fire hazard.
  • Install Wiring and Outlets: The electrician will run wiring through the walls and ceiling, install electrical boxes, and connect outlets, switches, and light fixtures. Ensure all wiring meets local electrical codes.
  • Install a Subpanel (Optional): If your shed requires significant power, consider installing a subpanel to provide adequate amperage and prevent overloading your main electrical panel.
  • Step 4: Interior Walls and Ceiling
  • Choose Wall Material: Select a wall material that suits your style and budget. Common options include plywood, drywall, shiplap, and OSB (oriented strand board).
  • Install Wall Panels: Cut the wall panels to size and attach them to the wall studs using screws or nails. Ensure the panels are aligned and securely fastened.
  • Finish Wall Seams (Drywall): If using drywall, apply drywall tape and mud to the seams and screw holes to create a smooth, seamless surface. Sand the mud smooth after it dries.
  • Paint or Finish Walls: Prime and paint or stain the walls according to your desired aesthetic.
  • Install Ceiling: Attach your chosen ceiling material (e.g., drywall, plywood, or tongue-and-groove planks) to the ceiling joists.
  • Step 5: Flooring
  • Prepare the Subfloor: Ensure the existing subfloor is level, clean, and free of debris. Repair any damaged areas.
  • Choose Flooring Material: Select a flooring material that is durable, easy to clean, and suitable for your intended use. Options include vinyl flooring, laminate flooring, tile, epoxy, and rubber mats.
  • Install Flooring: Install the flooring according to the manufacturer's instructions. Use appropriate adhesives or fasteners.
  • Add Baseboards: Install baseboards along the perimeter of the walls to cover the gap between the walls and the floor, providing a finished look.
  • Step 6: Lighting and Fixtures
  • Install Lighting Fixtures: Install overhead lighting fixtures, task lighting (e.g., desk lamps or under-cabinet lighting), and any other desired lighting.
  • Install Shelving and Storage: Install shelving units, cabinets, and other storage solutions to organize your belongings and maximize space. Consider both wall-mounted and freestanding options.
  • Install Workbenches or Desks: If you are using the shed as a workshop or office, install a workbench or desk that is appropriately sized and configured for your needs.
  • Step 7: Finishing Touches
  • Add Trim and Molding: Install trim and molding around windows, doors, and other architectural features to add a polished look.
  • Install Window Coverings: Install blinds, curtains, or shades to control light and privacy.
  • Decorate and Personalize: Add personal touches such as artwork, plants, and accessories to make the space your own.
  • Organize and Declutter: Arrange your belongings in an organized manner and remove any unnecessary items to create a functional and enjoyable space.
  • Conclusion: Enjoying Your Customized Tuff Shed
    By following these steps, you can transform your Tuff Shed into a functional and personalized space that meets your specific needs. Remember to prioritize safety throughout the process and enjoy the satisfaction of creating your own unique haven. With careful planning and execution, your Tuff Shed can become a valuable and versatile addition to your property.
    ```

    Mineralatlas Lexikon

    Mineralatlas lexikon www.mineralienatlas.de

    Beige Textured Rock Fragment Free Stock Photo

    Beige textured rock fragment free stock photo www.freeimages.com

    26 Facts About The Rock (movie)

    26 facts about the rock (movie) facts.net
    Read More
          edit

    Selasa, 23 September 2025

    Published September 23, 2025 by with 0 comment

    195+ Shed With Downspouts

    Cedar lap siding deluxe estate sheds www.gazebocreations.com

    ```html
    Introduction: Building a Simple Shed with Downspouts This guide will walk you through building a basic shed, focusing on a simple construction with added downspouts for effective water management. It's perfect for beginners, providing a clear, step-by-step approach.
    Planning & Preparation
  • Design and Dimensions: Determine the shed's size based on your needs and available space. Sketch a rough design.
  • Permits: Check local building codes and obtain necessary permits.
  • Materials List: Create a detailed list including lumber (pressure-treated for the base), siding, roofing materials, nails, screws, downspouts, gutters, and hardware.
  • Tools: Gather essential tools: saw, drill, level, measuring tape, hammer, safety glasses, and gloves.
  • Step 1: Building the Foundation
  • Site Preparation: Level the ground and remove any vegetation.
  • Frame Construction: Build a rectangular frame using pressure-treated lumber. Ensure it's square and level.
  • Adding Support: Install joists within the frame for added support. Space them evenly.
  • Foundation Material: Consider using a gravel base or concrete blocks to elevate the shed and improve drainage.
  • Step 2: Framing the Walls
  • Wall Framing: Build the wall frames using lumber. Include studs (vertical supports), top plates (horizontal at the top), and bottom plates (horizontal at the bottom).
  • Door and Window Openings: Frame openings for the door and any windows you plan to include.
  • Raising the Walls: Carefully raise each wall frame and attach it to the foundation frame. Use temporary supports to keep the walls upright.
  • Securing the Walls: Securely fasten the wall frames to each other and to the foundation frame using screws or nails.
  • Step 3: Roofing
  • Rafters: Construct the rafters according to your desired roof pitch.
  • Attaching Rafters: Attach the rafters to the top plates of the walls, ensuring they are evenly spaced and securely fastened.
  • Roof Sheathing: Cover the rafters with plywood or OSB sheathing, nailing it securely to the rafters.
  • Roofing Material: Apply roofing felt and then your chosen roofing material (shingles, metal, etc.) according to the manufacturer's instructions.
  • Step 4: Installing Siding
  • Choosing Siding: Select your siding material (wood, vinyl, metal, etc.).
  • Applying Siding: Install the siding according to the manufacturer's instructions, starting from the bottom and working your way up. Overlap the siding properly to prevent water penetration.
  • Trimming: Add trim around windows, doors, and corners for a finished look.
  • Step 5: Doors and Windows
  • Installing Doors and Windows: Install the door and windows into the framed openings, ensuring they are level and plumb.
  • Securing Doors and Windows: Securely fasten the doors and windows to the framing and add weather stripping to prevent drafts.
  • Step 6: Installing Gutters and Downspouts
  • Attaching Gutters: Attach gutters to the eaves of the roof using gutter hangers.
  • Positioning Downspouts: Determine the best locations for downspouts to direct water away from the shed's foundation.
  • Connecting Downspouts: Connect the downspouts to the gutters, ensuring a secure and watertight connection.
  • Extending Downspouts (Optional): Use extensions or splash blocks to further direct water away from the shed.
  • Step 7: Finishing Touches
  • Interior Finishing (Optional): Add interior walls, insulation, or shelving as needed.
  • Painting or Staining: Paint or stain the shed to protect it from the elements and improve its appearance.
  • Landscaping: Consider adding landscaping around the shed to improve drainage and aesthetics.
  • Conclusion: Enjoy Your New Shed! Congratulations! You've successfully built a shed with functional downspouts. This guide provides a foundation; remember to adapt the design and materials to your specific needs and local conditions. With proper care and maintenance, your shed will provide valuable storage space for years to come.
    ```

    Cedar Lap Siding Deluxe Estate Sheds

    Cedar lap siding deluxe estate sheds www.gazebocreations.com

    Cedar Shed Kits, Cedar Garden & Storage Sheds

    Cedar shed kits, cedar garden & storage sheds cedarshed.com

    Cedar Lap Siding Saltbox Sheds

    Cedar lap siding saltbox sheds www.gazebocreations.com
    Read More
          edit

    Minggu, 21 September 2025

    Published September 21, 2025 by with 0 comment

    126+ Chicken Coop Ebay Australia

    Grilled chicken leg animalia-life.club

    Introduction: Building Your Own Chicken Coop Thinking about raising chickens in your backyard? One of the first and most important steps is providing them with a safe and comfortable home. While you can purchase pre-built coops, building your own DIY chicken coop offers several advantages, including cost savings, customization, and the satisfaction of creating something with your own hands. This step-by-step guide will walk you through the process of building a basic and functional chicken coop.
    Planning and Design Before you start hammering and sawing, careful planning is essential. Consider these factors:
  • Size: Determine the number of chickens you plan to keep. A general rule of thumb is 4 square feet of coop space per bird and 8-10 square feet of run space per bird.
  • Location: Choose a level, well-drained location that receives both sunlight and shade. Consider proximity to your house and potential predators.
  • Materials: Decide on the materials you'll use. Common choices include lumber, plywood, hardware cloth, and roofing materials. Consider using reclaimed or recycled materials to reduce costs and environmental impact.
  • Design: Sketch out your design. A basic coop includes a roosting area, nesting boxes, a run (enclosed outdoor area), and a door for easy access for cleaning and egg collection. Ensure the design is predator-proof.
  • Materials List Here's a general list of materials you'll likely need. Adjust quantities based on your specific design:
  • Lumber (2x4s for framing, plywood for walls and roof)
  • Hardware cloth (1/2 inch mesh is recommended to keep out predators)
  • Roofing materials (shingles, metal roofing, or corrugated plastic)
  • Nails, screws, and staples
  • Hinges and latches for doors
  • Wood stain or paint (optional, for weather protection)
  • Nesting box material (plywood or scrap lumber)
  • Roosting bars (wooden dowels or branches)
  • Chicken wire (for the run, optional but provides better protection)
  • Sand or wood shavings for bedding
  • Tools List Gather the necessary tools before starting the build:
  • Saw (circular saw or hand saw)
  • Drill with drill bits and screwdriver bits
  • Hammer
  • Staple gun
  • Measuring tape
  • Level
  • Square
  • Safety glasses
  • Gloves
  • Step-by-Step Building Instructions
  • Step 1: Build the Base Frame: Construct a rectangular base frame using 2x4 lumber. Ensure it is square and level. This will be the foundation of your coop.
  • Step 2: Frame the Walls: Build the wall frames using 2x4 lumber. Include openings for the door and windows (if desired). Remember to leave space for the nesting boxes.
  • Step 3: Attach the Walls to the Base: Secure the wall frames to the base frame using screws or nails. Ensure the walls are plumb (vertical).
  • Step 4: Sheathe the Walls: Cover the wall frames with plywood, creating the exterior walls of the coop. Use screws or nails to attach the plywood securely.
  • Step 5: Build and Install the Roof: Construct a roof frame using 2x4 lumber. You can choose a slanted or gable roof design. Attach the roof frame to the top of the walls and then cover it with plywood. Install your chosen roofing material (shingles, metal, etc.) to protect the coop from the elements.
  • Step 6: Build and Install the Nesting Boxes: Construct nesting boxes from plywood or scrap lumber. A common size is 12x12x12 inches. Install the nesting boxes inside the coop, slightly off the ground.
  • Step 7: Install Roosting Bars: Install roosting bars inside the coop, higher than the nesting boxes. Chickens naturally prefer to roost at the highest point.
  • Step 8: Build and Install the Door: Construct a door for the coop using lumber and plywood. Install hinges and a latch to secure the door.
  • Step 9: Build the Run: Construct a frame for the run using 2x4 lumber. Attach hardware cloth to the frame to create an enclosed area for the chickens to roam safely. Dig the hardware cloth at least 12 inches into the ground to prevent predators from digging under.
  • Step 10: Attach the Run to the Coop: Secure the run to the coop, creating a seamless connection between the indoor and outdoor spaces.
  • Step 11: Add Finishing Touches: Add sand or wood shavings to the floor of the coop for bedding. Paint or stain the coop to protect it from the weather and improve its appearance (optional). Ensure all nails and screws are flush to prevent injury to your chickens.
  • Safety Considerations
  • Always wear safety glasses and gloves when working with power tools and materials.
  • Be careful when lifting heavy materials. Get help if needed.
  • Ensure the coop is well-ventilated to prevent the buildup of ammonia fumes.
  • Check the coop regularly for damage and make repairs as needed.
  • Consider local building codes and regulations before starting construction.
  • Conclusion Building your own chicken coop is a rewarding project that can save you money and provide your chickens with a safe and comfortable home. By following these step-by-step instructions and taking the necessary safety precautions, you can create a functional and attractive coop that will serve you and your flock for years to come. Remember to customize the design to fit your specific needs and preferences.

    Hawaiian Style Bbq Teriyaki Chicken Recipe

    Hawaiian style bbq teriyaki chicken recipe onohawaiianrecipes.com

    Miele Rotisserie Chicken Recipe At Rosemary Henry Blog

    Miele rotisserie chicken recipe at rosemary henry blog storage.googleapis.com

    Grilled Chicken Leg

    Grilled chicken leg animalia-life.club
    Read More
          edit

    Sabtu, 20 September 2025

    Published September 20, 2025 by with 0 comment

    103+ Flat Roof House Logo

    Main differences between flat & apartment every homebuyer should know www.homebazaar.com

    Introduction: Creating a Simple Bird Feeder from Recycled Materials Building a bird feeder is a fantastic way to attract wildlife to your yard, observe nature up close, and provide much-needed nourishment for feathered friends, especially during harsh weather. This guide provides a step-by-step approach to constructing a simple and effective bird feeder using readily available recycled materials. Not only is this a budget-friendly project, but it also promotes sustainability by repurposing items that might otherwise end up in landfills.
    Materials You'll Need:
    • A clean, empty plastic bottle (e.g., soda bottle, water bottle)
    • Two wooden spoons or dowels
    • A craft knife or scissors
    • Strong twine or wire
    • Birdseed
    Step-by-Step Construction: Step 1: Preparing the Bottle Begin by thoroughly cleaning and drying the plastic bottle. Remove any labels or residue. This ensures the birdseed remains untainted and makes the feeder more visually appealing. Step 2: Creating the Perches and Feeding Holes Using the craft knife or scissors, carefully make two small holes on opposite sides of the bottle, about 2-3 inches from the bottom. These holes should be large enough to insert one of the wooden spoons or dowels. Repeat this process again, about 4-5 inches above the first set of holes, ensuring the second set of holes is also on opposite sides of the bottle. Insert the wooden spoons or dowels through the holes, creating perches for the birds. Step 3: Creating the Seed Dispensers Below each spoon or dowel, use the craft knife or scissors to create a small opening. These openings should be large enough for birdseed to spill out onto the spoon/dowel but small enough to prevent excessive spillage. Start with small openings and gradually enlarge them as needed. Step 4: Adding a Hanging Mechanism Near the top of the bottle, create two small holes on opposite sides. Thread the twine or wire through these holes, creating a loop for hanging the bird feeder. Ensure the loop is securely fastened. Step 5: Filling the Feeder Carefully fill the bottle with birdseed. You may want to use a funnel to avoid spilling. Step 6: Hanging the Feeder Find a suitable location to hang your bird feeder. Choose a spot that is easily accessible for birds, away from predators like cats, and preferably sheltered from the wind and rain. Securely hang the feeder from a tree branch, hook, or other stable structure.
    Conclusion: Enjoying Your DIY Bird Feeder Congratulations! You have successfully created a functional and eco-friendly bird feeder using recycled materials. Regularly refill the feeder with fresh birdseed and clean it periodically to prevent the spread of disease. Observe the different types of birds that visit your feeder and enjoy the beauty of nature right in your backyard. Remember to keep the feeder clean and the seed fresh to ensure the birds stay healthy and happy.

    Flat Texturer

    Flat texturer www.etsy.com

    Main Differences Between Flat & Apartment Every Homebuyer Should Know

    Main differences between flat & apartment every homebuyer should know www.homebazaar.com

    Apartments To Buy In Sri Lanka

    Apartments to buy in sri lanka www.homelandsskyline.lk
    Read More
          edit

    Jumat, 19 September 2025

    Published September 19, 2025 by with 0 comment

    90+ Landscaping Ideas

    Front yard landscaping ideas: 15 amazing ideas www.arkaenergy.com

    Introduction: Elevate Your Outdoor Space with DIY Landscaping Projects Ready to transform your yard into a stunning oasis? Embarking on DIY landscaping projects is not only a fantastic way to personalize your outdoor space but also a budget-friendly alternative to hiring professional landscapers. This guide will walk you through a simple yet impactful DIY landscaping project, providing step-by-step instructions to create a beautiful and functional feature in your yard.
    Project: Building a Raised Garden Bed Raised garden beds offer numerous benefits, including improved drainage, better soil control, and reduced back strain. This project is perfect for beginners and can be completed in a weekend.
    Materials and Tools:
  • Untreated lumber (cedar or redwood recommended for durability)
  • Measuring tape
  • Saw (hand saw or circular saw)
  • Drill
  • Screws or nails
  • Landscape fabric
  • Staple gun (optional)
  • Soil (garden soil, compost, and potting mix)
  • Gloves
  • Safety glasses
  • Step 1: Design and Plan Before you start cutting wood, determine the size and location of your raised garden bed. Consider the amount of sunlight the area receives and choose a spot that gets at least 6 hours of sun per day for most vegetables and flowers. A common size is 4 feet by 8 feet, but you can adjust the dimensions to fit your space. Sketch a simple plan with measurements.
    Step 2: Cut the Lumber Based on your plan, cut the lumber to the required lengths. For a 4' x 8' bed with 1-foot height, you'll need:
  • Two 8-foot boards
  • Two 4-foot boards
  • Four corner posts (cut to 1 foot length, or slightly longer if you plan to bury them)
  • Ensure the cuts are straight for a clean, professional look.
    Step 3: Assemble the Frame Attach the 4-foot boards to the 8-foot boards to create a rectangular frame. Use screws or nails to secure the corners. Predrilling holes can prevent the wood from splitting. Ensure the frame is square by measuring the diagonals – they should be equal.
    Step 4: Attach the Corner Posts Attach the corner posts to the inside of the frame at each corner. This will provide additional support and stability to the raised bed. Use screws or nails to firmly secure the posts.
    Step 5: Line the Bed with Landscape Fabric Line the inside of the raised bed with landscape fabric. This will help prevent weeds from growing up into the bed and will retain moisture in the soil. Overlap the edges of the fabric and staple it to the wood frame using a staple gun (or simply fold it over and secure it with the soil).
    Step 6: Fill the Bed with Soil Fill the raised bed with a mixture of garden soil, compost, and potting mix. The exact ratio will depend on your soil type and what you plan to grow. A good starting point is a 1:1:1 ratio.
    Step 7: Plant Your Garden Now comes the fun part! Plant your desired flowers, vegetables, or herbs in the raised bed. Water thoroughly after planting.
    Conclusion: Reap the Rewards of Your DIY Landscaping Project Congratulations! You've successfully built a raised garden bed. With a little effort and creativity, you can transform your yard into a beautiful and productive space. Enjoy the fruits (and vegetables!) of your labor and continue to explore other DIY landscaping projects to enhance your outdoor living area. Remember to consistently maintain your garden bed by watering, weeding, and replenishing the soil as needed to keep it thriving for years to come.

    10 Inspirational Residential Landscaping Ideas To Make Your Yard Stand Out

    10 inspirational residential landscaping ideas to make your yard stand out www.terracastproducts.com

    Front Yard Landscaping Ideas: 15 Amazing Ideas

    Front yard landscaping ideas: 15 amazing ideas www.arkaenergy.com

    25 Best Gravel Landscaping Ideas And Designs

    25 best gravel landscaping ideas and designs suite101.com
    Read More
          edit

    Kamis, 18 September 2025

    Published September 18, 2025 by with 0 comment

    156+ Flat Roof Zimbabwe Rural House Plans

    Main differences between flat & apartment every homebuyer should know www.homebazaar.com

    ```html
    Introduction: Building a Simple DIY Chicken Feeder Keeping your chickens fed and happy doesn't have to be expensive or complicated. This step-by-step guide will walk you through building a simple, durable, and efficient DIY chicken feeder that will minimize waste and save you money on feed. This feeder is designed for outdoor use and can be adjusted to suit your flock's size.
    Materials You'll Need
  • One 5-gallon bucket with a lid
  • One PVC pipe elbow (45 or 90 degree, approximately 3-4 inches in diameter depending on chicken size)
  • Drill with various sized drill bits
  • Jigsaw or utility knife
  • Measuring tape or ruler
  • Pencil or marker
  • Step 1: Preparing the Bucket First, clean the 5-gallon bucket thoroughly to remove any residue. Using your measuring tape and pencil, mark a circle on the lower side of the bucket where you want to install the PVC elbow. This mark should be slightly smaller than the outer diameter of the PVC elbow.
    Step 2: Cutting the Hole Using your drill, create a pilot hole within the circle you marked. Then, carefully use the jigsaw or utility knife to cut out the circular hole. Make sure the hole is clean and relatively smooth to prevent sharp edges. It's better to start smaller and gradually enlarge the hole to ensure a snug fit for the PVC elbow.
    Step 3: Installing the PVC Elbow Insert the PVC elbow into the hole you created. It should fit snugly. If the fit is too loose, you may need to use a sealant (food-safe silicone) to secure it and prevent feed from leaking. If the fit is too tight, carefully enlarge the hole slightly. Aim for a snug pressure fit.
    Step 4: Securing the Feeder (Optional) Depending on your setup and the behavior of your chickens, you might want to secure the feeder to a post or wall to prevent it from tipping over. You can drill holes near the top of the bucket and use rope or wire to attach it to a stable structure.
    Step 5: Testing and Filling Before leaving the feeder out for your chickens, test it by filling it with a small amount of feed. Observe how the feed flows and how easily your chickens can access it. Adjust the position of the elbow slightly if needed. Once you're satisfied, fill the bucket with the desired amount of feed and securely attach the lid.
    Step 6: Preventing Rainwater (Optional) To further protect the feed from rain, consider adding a small roof or overhang above the PVC elbow. This can be as simple as a piece of angled metal or plastic attached to the bucket or the surrounding structure.
    Conclusion: A Cost-Effective and Practical Solution Congratulations! You've successfully built a simple and effective DIY chicken feeder. This feeder will help reduce feed waste, keep your feed dry, and make feeding your chickens a much more manageable task. Remember to regularly check the feeder for clogs and refill it as needed. With minimal effort and readily available materials, you can provide a constant and clean food source for your flock.
    ```

    Main Differences Between Flat & Apartment Every Homebuyer Should Know

    Main differences between flat & apartment every homebuyer should know www.homebazaar.com

    Anineo Boys Summer School Shorts For Students Comfortable Casual Elastic Waist Flat Front

    Anineo boys summer school shorts for students comfortable casual elastic waist flat front www.walmart.com

    Apartments To Buy In Sri Lanka

    Apartments to buy in sri lanka www.homelandsskyline.lk
    Read More
          edit

    Rabu, 17 September 2025

    Published September 17, 2025 by with 0 comment

    100+ Flat And Sloped Roof Design

    What is a flat? discover if this rental option is right for you www.apartmentguide.com

    Opening: Dreamy Roofscapes A DIY Guide
    Want to add character and charm to your miniature world? Whether you're crafting a dollhouse, a wargaming terrain piece, or simply a decorative element, a unique roof can make all the difference. This guide will walk you through building both flat and sloped roofs, giving your creations a professional and polished look.
    Step 1: Gathering Your Materials
    Before diving in, make sure you have everything you need. The specifics will depend on the size and style of your project, but here's a general list:
  • For the Roof Base: Cardboard (cereal boxes work great), Foam board, or Balsa wood. Choose a material that's sturdy but easy to cut.
  • For Roofing Material: Craft sticks (popsicle sticks), Cardstock, Corrugated cardboard, Miniature roof shingles (available at craft stores), or even fabric scraps. Get creative!
  • Adhesive: Craft glue (like Elmer's or Tacky Glue), Hot glue (use with caution, especially with foam).
  • Tools: Ruler, Pencil, Craft knife or scissors, Sandpaper (optional), Paint and brushes (for finishing).
  • Step 2: Building a Flat Roof
    A flat roof is the simplest to construct.
  • Measure and Cut the Base: Measure the area you want the roof to cover. Cut your chosen base material (cardboard, foam board, etc.) to the exact dimensions. Accuracy is key for a clean fit.
  • Add Texture (Optional): For a more realistic look, glue a layer of corrugated cardboard to the base. This adds a subtle texture reminiscent of built-up roofing.
  • Seal and Paint: Seal the entire roof with a layer of thinned-down glue or a primer to prevent warping. Once dry, paint the roof in your desired color. Gray or black are common choices for flat roofs. You can also add details like weathering or simulated gravel.
  • Step 3: Creating a Sloped Roof Measuring and Cutting
    Sloped roofs are a bit more involved, but the results are well worth the effort.
  • Determine the Pitch: The pitch of the roof is its angle. A steeper pitch looks more dramatic, while a shallower pitch is more subtle. Sketch out your building and decide on the look you want.
  • Calculate Rafter Length: This is where a little math comes in. You'll need to use the Pythagorean theorem (a² + b² = c²) to calculate the length of the rafters (the angled supports). 'a' is half the width of the building, 'b' is the height of the roof peak above the walls, and 'c' is the rafter length. There are also online roof pitch calculators that can simplify this.
  • Cut the Rafters: Cut two identical rafters from your chosen base material (cardboard, balsa wood, etc.). Be precise with your cuts.
  • Cut the Roof Panels: Cut two rectangular pieces from your chosen base material. These will be the main panels of the roof. The length should match the length of the building, and the width should be slightly longer than the calculated rafter length to allow for a slight overhang.
  • Step 4: Assembling the Sloped Roof Frame
    Now it's time to put the pieces together.
  • Assemble the Rafters: Glue the two rafters together at the top, forming an inverted "V" shape. Ensure the angle matches your desired roof pitch. Let the glue dry completely.
  • Attach the Roof Panels: Glue the roof panels to the rafters, ensuring they are aligned correctly. Overhangs should be equal on both sides. Use clamps or weights to hold the pieces in place while the glue dries.
  • Step 5: Applying Roofing Material
    This is where the magic happens.
  • Craft Sticks: Start at the bottom edge of the roof and glue craft sticks (popsicle sticks) in overlapping rows, working your way up to the peak. This creates a classic shingle effect.
  • Cardstock/Corrugated Cardboard: Cut cardstock or corrugated cardboard into strips and glue them on in overlapping rows.
  • Miniature Shingles: If you're using miniature shingles, follow the manufacturer's instructions. They typically come with an adhesive backing or require a thin layer of glue.
  • Fabric Scraps: Cut fabric into small squares or rectangles and glue them on in a pattern, creating a unique and textured roof.
  • Step 6: Finishing Touches
    Almost there!
  • Trim and Sand: Once the glue is dry, trim any excess roofing material with a craft knife or scissors. Sand any rough edges for a smooth finish.
  • Paint and Weather: Paint the roof in your desired color. Add weathering effects with dry brushing or washes to give it an aged and realistic look.
  • Add Details: Consider adding details like a chimney, gutters, or dormers to further enhance the roof's appearance.
  • Conclusion: Roof Design Achieved
    Congratulations! You've successfully created a flat or sloped roof. With a little practice and experimentation, you can design and build roofs of all shapes and sizes, adding a touch of craftsmanship to your miniature projects. So go forth and roof your little heart out!

    Modern Residential Flat Scheme Exterior By, Ar.sagar Morkhade (vdraw Architecture…

    Modern residential flat scheme exterior by, ar.sagar morkhade (vdraw architecture… www.pinterest.com

    Flat

    Flat dailycivil.com

    What Is A Flat? Discover If This Rental Option Is Right For You

    What is a flat? discover if this rental option is right for you www.apartmentguide.com
    Read More
          edit